
A frozen kitchen sink pipe is ordinary for those who stay in super cold areas. A solid water faucet is formed in the pipe blocking the whole kitchen sink drainage system when this happens. So the first thing to do when you want to unfreeze kitchen sink pipes is to locate the frozen part.
And the method of unfreezing the kitchen sink pipes will depend on the type of plumbing in your home. Most plumbing systems are either external or internal. External plumping is when pipes are clipped on the wall while internal pipes are installed in the wall. Of course, unfreezing external pipes is easier than internal pipes.
Always look for vulnerable areas like the pipes near the uninsulated areas and basements. Also, pipes near the cold air vents and concrete are at risk of freezing. Always check for cracks or leaks in the affected area. The frozen water creates pressure that splits the pipe length-wise; replace the pipe if this is the case.
How To Unfreeze External Kitchen Sink Pipes
1. Use a Hair Dryer/heat Gun
This is the easiest way to unfreeze the frozen kitchen sink pipe. Simply switch on the hairdryer and point it at the frozen section. Move the dryer back and forth along the frozen area. Do not point it at one section because it can create sudden heating and break the pipe. However, you should consider the type of pipe you have.
Use more heat on metallic pipes and avoid temperatures higher than 140F on PVC pipes. Some outdoor valves have flammable fibers; hence you should avoid heat in such areas.
2. Use a Heat Tape
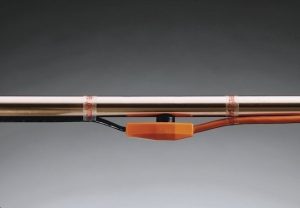
A heat tape is a simple device that releases heat when electricity flows through the conductor. Clean the frozen area on the pipe and wrap the heat tape. Cleaning creates direct conduct on the pipe and better heating optimization. Insulate the wrapped area before you turn on the heat tape. You can use a towel or any piece of cloth to insulate the area.
3. Use a Space Heater or Heat Lamp

You can also heat the surrounding area with a space heater or a heat lamp. This is the best method if you will not be around to manage the device. Just plug in the heat lump and position it to face the frozen area.
Experts recommend two feet as the safest distance to position the heat lamp. It is also the best method for PVC pipes because there is no direct contact. Use several heat lamps if the room is big. And always consider all-electric precautions when using heat lamps.
4. Add Salt
From the simple chemistry that salt lowers the melting point of water, use this knowledge to unfreeze kitchen sink pipes. Pour a tablespoon of common salt into the drain and allow it to dissolve the ice. However, use this method when the frozen area is close to the kitchen sink.
You can also dissolve the salt in a cup of hot water and pour it down the drain. It is a good technique but you risk busting the pipe due to a sudden temperature change.
5. Use a Hot Towel
You can use a hot towel when the condition is not worse. Use this method when you have early knowledge of the area that suffers from freezing. When you notice signs of a frozen pipe, run and wrap the hot towel on the area. Dip the towel in hot water and carefully wrap it around the frozen pipe. Dip the towel again in hot water when it lowers the temperature.
How To Unfreeze Internal Kitchen Sink Pipes
1. Use a Heater Fan in the Outdoor Vents
The pipes inside the wall freeze due to the cold air entering through the outdoor vents. Find an external vent and blow in warm air. Soon the walls will be warm and conduct the heat to the pipes hence unfreezing them. You can also close down the external vents when the cold season approaches to prevent freezing of kitchen pipes.
2. Keep Your House Warm
Turn on the heating units in your house to maintain a high temperature. The warmth will be conducted to the walls hence heating the pipes. Professionals recommend you maintain the temperature around 80F for better warmth. Make a hole on the wall if you can locate the frozen part inside the wall.
How To Prevent Kitchen Pipes From Freezing
1. Insulate the Pipes

Identify the pipes in vulnerable areas like the basement and wrap them with a pipe sponge to maintain the optimal temperature. You can use pieces of cloth when you do not have a pipe sponge. The thumb rule is that the more insulation, the better. The insulation also protects your pipes from other damages like a physical impact.
2. Use Heat Tapes or Heat Cables
A heat tape can unfreeze kitchen sink pipes, but you can also use it as a preventive tool. As long as you know where the freezing happens, you can wrap that area when the cold season approaches. Nevertheless, constantly monitor the heat tape or cables to avoid overheating the kitchen pipes. And do not use these devices on PVC pipes because they can lead to bursts.
3. Minimize Cold Crawlspaces
Cold air will lead to the freezing of kitchen pipes, so you have to lock down all crawlspaces that allow in super cold air. Seal all holes on the wall, including maintenance holes that help in repairs. Dryer vents and fireplaces chimneys are the main inlets for cold air. Ensure the cold air stays out, and your kitchen pipes will stay open all year round.
4. Let the Water Trickle
Allow the water to trickle down the drain because it is hard for running water to freeze. Running water creates kinetic energy and friction force along the pipes, producing enough heat to keep it in the liquid state. Although, the world environmental organization does not recommend this method. The organization finds it to be a waste of natural resources and water.
5. Always Warm Your House
Please keep the temperatures above 55F in your house during winter. Turn on the central heating system and other heat sources for about 3 hours a day. Doing so will keep your house warm enough for an internal plumbing system. Turn on heat lumps and space heaters in areas like the basement and attics.
How to Clean a Stainless Kitchen Sink
What you need
– Baking soda
– Vinegar
– Olive oil
– Paper towel
– Cleaning sponge
– Lemon peel
Step #1. Make sure the sink is empty before you start cleaning. Sprinkle the baking soda on the empty sink and allow it to sock for some time.
Step #2. After 30 minutes, scrub the surface with a cleaning sponge and add vinegar where you see stubborn stains.
Step #3. Rinse the stainless steel sink with clean water until the whole sink is clear.
Step #4. Take the lemon peels and rub them on the clean stainless steel. The lemon peels help to remove the strong vinegar smell, and baking soda leftovers.
Step #5. Put a few drops of olive on a paper towel and buff the sink to make it shiny. The meaning of stainless steel is a shiny surface.
How To Clean a Ceramic Kitchen Sink
What you need
– Clean water
– Vinegar
– Piece of cloth
– Toothbrush
– A lemon
Step #1. Pour two liters of clean water into a bowl and add 100ml of vinegar. Mix the solution to perfect concentration.
Step #2. Take a clean cloth, dip it in the vinegar solution, and then wipe the ceramic sink. The solution will easily remove stains and other limescale. Make sure the vinegar does not take time on the ceramic surface because it can damage the surface.
Step #3. Rinse the surface with clean water, and the whole sink will be sparkling clean. And use the toothbrush to remove stubborn stains. You can apply the lemon to make the surface shine.
Factors To Consider Before Purchasing a Kitchen Sink
1. Material
Most kitchen sinks are stainless steel, copper, ceramic, porcelain, or cast iron. All these materials have pros and cons, but look at your intended use and choose one. Stainless steel is the best material for kitchen sinks because it is easy to clean and does not hold stains. Porcelain is the second-best material but can catch stains and scuffs.
2. Size
The size of a kitchen sink goes hand in hand with the purchase price. Choose a sink that will fit in your kitchen without taking up a lot of space. Select a big kitchen sink if you have a huge household and frequently use the sink. On average, the kitchen sink is about 25 inches big. Also, look at the sink’s design that matches the countertop.
3. Single VS Double Kitchen Sink
It is good to choose a double kitchen sink because it helps separate clean and dirty dishes. A double kitchen sink does not mean it is too big, but it is an average sink with two bowls. Double sinks make it easy to wash dishes, especially if you have a big family. Select a substantial single sink if you want a big useable space.
4. Drop-in VS under-mount
A drop-in kitchen sink is fixed just on top of the kitchen counter but slightly drops into the counter. A drop-in sink has a little lip or bump on the counter. On the other hand, under-mount kitchen sinks are attached below the counter, making the whole counter appear seamless. So look at the two characters and choose one that suits your desires.
The under-mount sink comes in stylish designs and makes your kitchen counter look great. This sink does not have a lip or bump; hence no oils and dirt can accumulate between the counter and the sink. However, this type of kitchen sink is very expensive and hard to install.
The drop-in kitchen sink is very affordable, and you can install it without professional skills. Nevertheless, this kitchen sink is hard to clean because dirt accumulates in the edges of the lip and countertops.
5. Location
Where you will install the kitchen sink will determine the type and design of the kitchen sink. Place the sink in a location that will make your kitchen look perfect. Interior designers recommend you place the sink next to a window. The fresh air from outside will eliminate the bad smell from the dirty dishes in the sink.
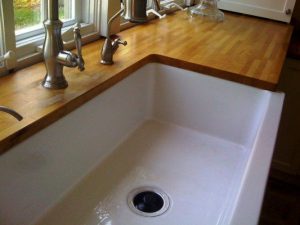
How To Install a Kitchen Sink On a Wooden Counter
Tools
– Jigsaw
– Plumber’s putty
– Marker pen
– Ruler
– Screws and screwdrivers
Step One
Measure and draw out the sink dimensions on the counter using a marker pen. Give an allowance of one inch on the edges of the counter. Use a ruler to mark the sinkhole area. You will end up with a rectangular outline.
Step Two
Use a jigsaw blade to cut through the outline. Carefully cut along the drawn lines and remove the middle piece. Place your new sink in the hole to see if it fits. Align the edges with the jigsaw if the sink does not fit properly.
Step Three
When you are sure the sink will fit, start installing the faucet. Set the faucet tubing to be in the center of the sinkhole. And place some gaskets and seals on the faucet tubing.
Step Four
Now place the sink over the hole and tighten the faucet tubing with several seals on the bottom of the sink. Then apply a plumber’s putty on the strainer and attach it to the sink. Wipe off the excess putty with a piece of cloth.
Step Five
Connect the extras of the sink like the water supply and drain pipes. You can also link your sink to the garbage disposal. Please use a professional if you do not know how to make all these extra connections.
Final Thoughts
Ensure you unfreeze kitchen sink pipes before they burst due to excess pressure. First, identify the frozen area, then try all technics available. External pipes are easy to unfreeze than internal pipes. In conclusion, heat tapes and hair dryers are the best for unfreezing pipes but do not use them on PVC pipes.