
A kitchen is hardly any good without a set of reliable cabinets. After all, not only do they store cooking essentials, but they also showcase the theme of your kitchen. So, what happens when your cabinets begin to fade? Is it possible to restore them? And how to fix worn spots on kitchen cabinets?
From staining to painting, fixing kitchen cabinets is possible. And with the proper methods, yours should look fresh and new in no time.
Check out my guide below to say goodbye to discoloration and worn spots on your cabinets.
Possible Causes of Worn Spots in Kitchen Cabinets
Kitchen cabinets are among the first elements you’ll notice in a kitchen. After all, it serves as essential storage while setting the tone and style of your kitchen! However, these won’t look great forever like any other part of your home. Over time, your cabinets will fade, gaining worn spots alongside dents and dings.
But cabinets can attain worn spots due to several things in your kitchen. So, it’s crucial to what exactly is affecting your cabinetry. Either way, once you see the leading cause of the damage, finding the solution should be a breeze!
So, before we discover how to fix worn spots on kitchen cabinets, check out these common causes:
- Spilled food. Kitchen cabinets can get severely faded and damaged over time due to uncleaned, spilled foods that have sat out too long.
- Excess steam. Exposure to steam/moisture from coffee pots, cookware, and other kitchen gadgets can damage kitchen cabinets.
- Leaks. Whether it’s leaking from your walls, busted pipes, or liquid from stored meals, leakage can be harmful to your cabinetry.
- Poor build quality. Cabinets with low-quality treatment or finishings can develop worn spots faster. It might also lead to more serious damage like chipping and fading.
- Type of wood. If your kitchen cabinets have a wooden structure, their susceptibility to damage varies. After all, different kinds of wood can be prone to fading, warping, or general degradation, while others can last longer.
Again, I suggest looking for these signs before restoring your cabinets. After all, they let you know what specific elements are damaging your cabinetry. So, don’t get discouraged if you see fading and similar damage as they’re still repairable.
How to Fix Worn Spots on Kitchen Cabinets?
I want to make a few pointers before we dive into the nitty-gritty of fixing worn spots on kitchen cabinets.
Firstly, never skip cleaning and sanding as it can negatively affect the outcome. After all, these help the stain or paint stick to the cabinets’ surface better. So, even if it seems like a hassle, follow it for the best results!
Aside from this, I suggest using a mask for the entire process. That’s because handling paint and stains expose you to potent fumes. If not, have your kitchen well-ventilated. However, this lets dust and other debris come in, putting your cabinetry at risk.
Another safety measure I wanted to emphasize is to wear vinyl gloves! These protect you from the harsh chemicals present in stain and paint. It saves you a lot of time as both can be challenging to remove. Either way, keep safe and restore your kitchen cabinets responsibly.
Well, now that I’ve got that out of the way, here’s how to fix worn spots on kitchen cabinets:
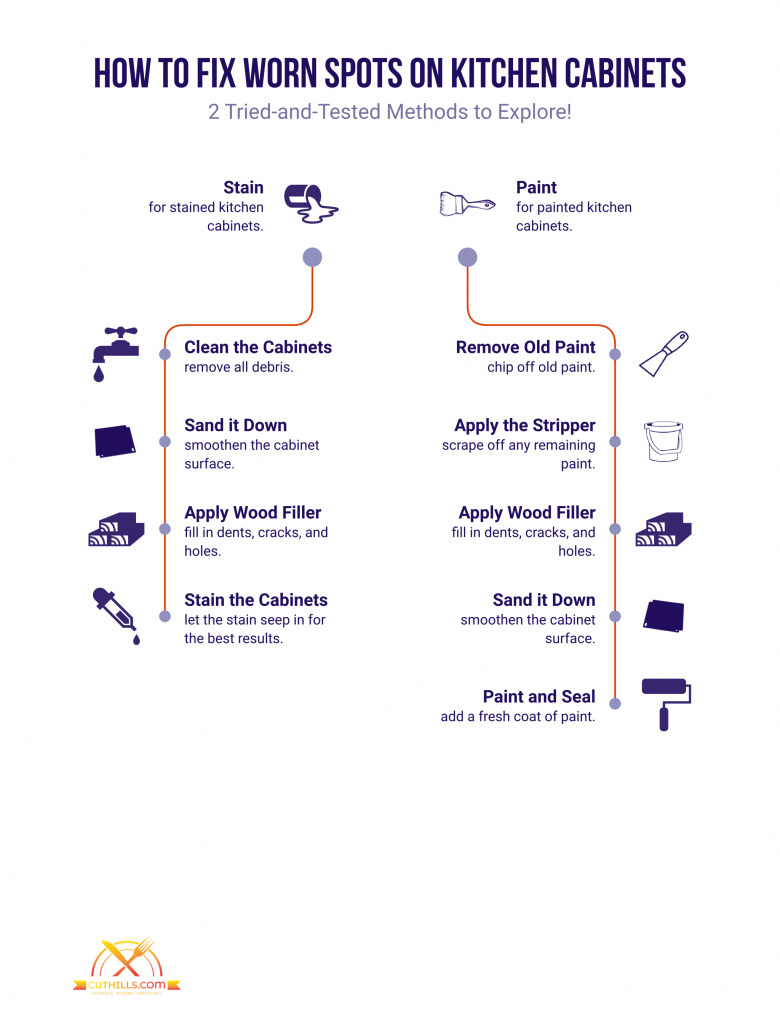
Fixing Worn Spots on Kitchen Cabinets with Stain
If you’re dealing with stained kitchen cabinets, fixing worn spots on these is a breeze. After all, it’s easy, cheap, and anyone can tackle the task!
With that said, here’s how to fix worn spots on stained cabinets:
▶ Working on Kitchen Cabinetry with Dark Tones
If you have stained cabinets with darker tones, here’s what you need to do:
1️⃣ Clean the Cabinets
As I mentioned earlier, cleaning is crucial. It saves you time and also ensures the best results! It removes all grease, dust, grime, dirt, and other debris from your cabinetry.
I suggest creating a cleaning agent with Trisodium Phosphate (TSP) and warm water. It helps you get rid of the toughest grime from the deepest parts of your cabinetry. And you don’t need to worry as it’s 100% safe to use and is relatively cheap.
Also, never scrub your cabinets with an abrasive sponge or ball of steel wool. These might cause further damage, making your job harder than necessary.
After cleaning, let the cabinets dry completely before proceeding to the next step.
2️⃣ Sand it Down
Once your kitchen cabinets are dry, it’s time to sand them down. I recommend using sandpaper lightly to avoid stripping off too much. So, if you see paint chipping off, it’s time to stop.
Either way, use a clean tack cloth to remove excess dust on the surface. Make sure to leave no speck of dust behind as it can affect the final results!
3️⃣ Stain the Cabinets
Finally, finish up by applying polyurethane varnish and stain on the cabinets. I like doing the varnish-stain combo as it adds a bit of shine to the cabinets. And it doesn’t need several applications! Either way, follow the manufacturer’s directions for the best results.
Let the stain and varnish dry completely before using your kitchen cabinets again.
▶ Working on Kitchen Cabinetry with Light Tones
If you have stained cabinets with lighter tones, here’s what you need to do:
1️⃣ Clean the Cabinets, Remove the Old Stain
Besides the mandatory cleaning of the cabinets, you must get rid of the existing stain. After all, when working on light-toned kitchen cabinets, you need to remove as much of the old stain as possible. You can use chlorine bleach, a paint stripper, or a paint remover.
I suggest using a scraper to get into your cabinetry’s deepest contours.
2️⃣ Apply Wood Filler (Optional)
Applying wood filler is necessary for light-stained cabinets to remove the old stain. You’re bound to encounter dents, scrapes, or holes in the process.
However, skip this step if your cabinets’ surface is smooth and free from any flaws. But I suggest applying wood filler even in the smallest of damages as it can make a huge difference.
3️⃣ Stain the Cabinets
Stain your kitchen cabinets as per the stain brand you’re using instructions. But unlike the previous process, light-toned cabinets need several coatings. It helps you get the perfect shade matching your cabinetry.
After achieving your desired hue, let the stain dry completely. Once thoroughly dried, apply some protective sealant to allow the stain to last for a while.
When the sealer dries up, clean the cabinets with a clean tack cloth. Ensure your cabinetry is free from debris for a flawless and lasting finish!
Fixing Worn Spots on Kitchen Cabinets with Paint
If you have painted kitchen cabinets, fixing worn spots is as easy as the previous method! But you’ll need to do this process more often as, based on experienced, paint usually wears out faster than stain.
Regardless, if you have painted cabinets, here’s what you need to do:
1️⃣ Remove Old Paint
Get rid of as much old paint or finish as you can. Doing so gives you a cleaner and fresher surface to work on. And as a result, you’ll achieve a more cohesive finish, freeing your cabinets from worn spots! With this, your cabinetry should look brand new in no time.
2️⃣ Apply the Stripper
Grab the same paint stripper you used earlier and add extra to scrape off the remaining paint. However, please don’t overdo it as it can damage your cabinetry’s structure and surface.
Once you’ve freed your kitchen cabinets from old paint, it’s time to proceed to the next step.
3️⃣ Apply Wood Filler
Apply wood filler if you notice any dents, scrapes, cracks, or holes in the cabinets. This should make your cabinetry as smooth as possible, virtually erasing all flaws! Once filled up, allow the wood filler to dry entirely before going to the next step.
4️⃣ Sand It Down
When the wood filler dries up, it’s time to sand down your cabinets.
I suggest using 100-grit sandpaper for the best results. This variation lets you remove excess debris, smoothing out your cabinetry without damage! You can go higher if needed but never go beyond 200-grit as this guarantees scrapes.
After your cabinets are all smoothened out, take a cloth, vacuum, or broom to remove debris around you.
5️⃣ Paint and Seal
Wipe down the surface once your cabinets and work area are free from debris. I recommend doing this before painting as it ensures grit-free results. Also, when painting your kitchen cabinets, keep a steady and consistent direction. This way, you’ll be able to achieve a gorgeous and nearly flawless finish!
Once you’re happy with the results, finish by adding a sealer. You can wipe your cabinets down with a clean tack cloth before applying the sealer. Doing so ensures your cabinets are as smooth as they can be.
Finally, when the sealer dries up, rub the newly painted cabinets with 000 steel wood. This gives it a neater and smoother look.
Fixing Worn Spots on Kitchen Cabinets: Addressing Other Issues
I’ve addressed how to fix worn spots on kitchen cabinets with dents, dings, and more. However, what happens when you’re dealing with other kinds of damage? From worn spots caused by water damage and excess peeling, here are other ways to fix your kitchen cabinets:
Fixing Worn Spots Caused By Water Damage
When left alone, wet cabinets may degrade from the inside out, making them unfixable.
I’ve listed the steps to do when repairing water-damaged cabinets to make it easy.
This should help you fix your water problem fast—and without trouble!
1️⃣ Assess the Situation
Determine how badly damaged your kitchen cabinets are from the water. Doing so helps you see the most affected parts, allowing you to find the best solution in no time! After all, water damage from busted pipes requires more repairs than those from a simple leak.
Once you find the primary source of the water damage, see if you can fix it yourself. That, or see how much you need to do to repair your cabinetry fully. Have its wooden structures warped? Or is it severely waterlogged?
Remember to make out an answer to your following queries early on. This way, deciding on a repair plan will be hassle-free. It also lets you know if you can fix the damage or if you need to hire a professional.
Either way, it pays to assess your cabinets first. So, get on to checking!
2️⃣ Dry it Off and Get Your Tools
After assessing the extent of the damage to your kitchen cabinets and you know what to repair, dry them off. To do this, wipe off the affected and damp areas using a clean cloth. Once you’ve dried off the cabinetry, it’s time to get your tools!
Although it depends on the material and water damage severity, here are things you’ll need:
- Screwdriver
- Clamps
- Carpenter’s glue
3️⃣ Seal it Off
Using your carpenter’s glue, seal off any cracks or holes formed by the water damage. And if needed, you can remove the shelves with the screwdriver to seal off hard-to-reach places. You can use the clamps to make the process easier for you.
Also, I’d like to mention that this method is only suitable for addressing minor damage. So, if you have an old or severely damaged kitchen cabinet, contact a professional instead.
Aside from that, keep in mind that some damages are beyond repair. For instance, if your under-sink kitchen cabinet becomes waterlogged, there’s no other way. You need to replace it!
If not possible, you can consult with a professional to see your best option.
Fixing Worn Spots Caused By Peeling

Kitchen cabinets inevitably go through a lot every day. After all, it’s the most trafficked room in any home. So, a slight peeling and wearing out is bound to happen.
Luckily, you can quickly address this by painting a new coat of paint over the affected areas.
Remember to use matching paint. After all, using another hue can make your damaged cabinetry worse.
You can also try the dying process for cheap! It provides your kitchen cabinetry with a new and fresh look, hiding peels, chips, dents, etc.
Either way, I recommend addressing peeling fast as it can develop more worn spots on your cabinets! And these can be more challenging to deal with later on.
Kitchen Cabinet Care (Additional Tips)
After learning how to fix worn spots on kitchen cabinets, it pays to make it as long as possible. After all, you wouldn’t want to redo the process over—and over again. That’s why it’s crucial to follow routine upkeep to make your restoration last.
So, after refinishing your kitchen cabinets, here are a few kitchen cabinet care and maintenance tips to keep in mind:
✅ Wipe responsibly
When cleaning your kitchen cabinets, avoid using rough rags. Instead, utilize a soft cloth, ensuring every corner is covered without inflicting damage.
✅ Stick with bi-weekly cleaning
I recommend cleaning your cabinetry as minimally as possible. After all, too much scrubbing and washing can wear out the paint or stain. However, if needed, you can clean your cabinets twice every month. It should be safe enough for them.
✅ Go mild
If plain water isn’t enough to clean your kitchen cabinets, add some mild dishwashing soap. It’s strong yet safe enough to get rid of the toughest grimes.
✅ Grab your kitchen essentials
Make a baking soda paste if mild soap isn’t doing it for your cabinetry. It should be enough to remove stubborn areas.
✅ Use grease and grime properly
These two can add an excellent shine to cabinets, but they can do more harm than good when misused. So, use grease and grime to a minimum.
✅ Know your products
Some cleaners can damage your kitchen cabinets no matter how careful you are. So, know what products are safe for your cabinetry—and those that are not. Generally, avoiding bleach, solvents, petroleum products, ammonia, and nail polish remover is ideal.
Also, as mentioned earlier, never use anything harsh when scrubbing cabinets. That means never use steel wool or an abrasive sponge!
Frequently Asked Questions
Q: How often do I need to maintain my kitchen cabinets?
A: Since the kitchen is one of the busiest and most crowded rooms in a house, you might need to fix your cabinets regularly. And this can be more frequent if you have young kids or rambunctious pets. I recommend staining or painting your cabinetry quarterly. However, if your kitchen goes through plenty of action, do it as often as every two months.
Q: What’s the best way to touch up worn spots on my kitchen cabinets?
A: If you have parts on your cabinet that look worn or faded, coat them with paint. But this largely depends on the current finish of your cabinetry. Either way, it’s excellent at restoring worn spots, fixing even minor scratches. On the other hand, if your cabinets have massive problem areas, I suggest redoing your entire cabinetry. After all, some things are beyond repair.
Q: Is it possible to restore my kitchen cabinets without sanding or varnishing them?
A: Painting is an excellent alternative if you don’t want to go through sanding or varnishing. You can place a fresh coat of paint on your cabinets with chalk or oil-based paint. Either way, these help you restore your cabinetry without much effort. Just make sure to apply wood primer afterward for a lasting effect.
Q: How to upgrade my kitchen cabinets without replacing them?
A: You can paint your kitchen cabinets instead if you want an upgrade but don’t want to spend thousands. It’s cheaper and more straightforward to do! And for more extensive upgrades, you can change the handles and other cabinet fixtures over time.
Q: How can I protect my kitchen cabinets from damage?
A: The best way to protect your kitchen cabinetry from excess damage is by cleaning it often. Doing this frees your cabinets from debris that may leave severe damage after some time. And if possible, apply some protective sealant often. It prevents cracking, peeling, chipping, etc.
Q: How to clean and shine my kitchen cabinets?
A: It’s best to use a damp cloth to nitpick dust and other debris from your cabinetry. Meanwhile, for shining, I recommend elbow grease for the best results. It removes grit while leaving a lasting shine.
Final Words
How to fix worn spots on kitchen cabinets? From simple sanding to complex staining, addressing these problem areas is doable. And this post will guide you to make your cabinets look brand new in no time! So, test out the techniques and tell me which one worked the best for you.